How-To and Basic Usage Guide
Install PySimlink
PySimlink installs with pip, but requires compiler to build models. This compiler needs to be discoverable by the cmake binary that’s installed with pip.
While mingw is a valid compiler on Windows, it’s much simpler to use the Visual Studio tools.
Setup
A couple of os-specific steps are required if you’ve never done any c/c++ development before. Don’t worry though, this doesn’t mean you have to dig into the c++ code. We just need to be able to compile it.
Windows |
Download Visual Studio (Only the “Desktop Development with C++” workload) [1] |
OSX |
Install the Command Line Tools for Xcode. |
Linux |
All you need is gcc, g++, ld, and make. How you get that is up to your distribution. |
If you use ninja or another build system, you’ll need to modify the
generator argument of the Model constructor to match. You can
see the list of available generators by running cmake --help (these are
what cmake knows how to generate, not what is installed on your system).
Install PySimlink with pip
pip install pysimlink
Generate Code From Your Simulink Model
Note
To be able to generate code, you must have a license to the Simulink Coder.
PySimlink requires a set of model parameters be set before the code generation process. This comes with a few limitations, the most important is that the model must run using a fixed-step solver.
1. Update Model Parameters
Tip
If you are using model references, try using configuration references so you don’t have to change these settings in each model’s configuration set.
PySimlink requires a few model settings to generate code in a format that it can interact with.
You can do this either using the script provided in the Quickstart page or manually by changing the parameters manually in the following steps.
First, open the model settings under the modelling tab.

Model Settings located in the modelling Menu Bar.
Solver Settings
On the Solver page, make sure you’re using a Fixed-step solver. Also uncheck the Treat each discrete rate as a separate task box. Finally, uncheck the Allow tasks to execute concurrently on the target box.
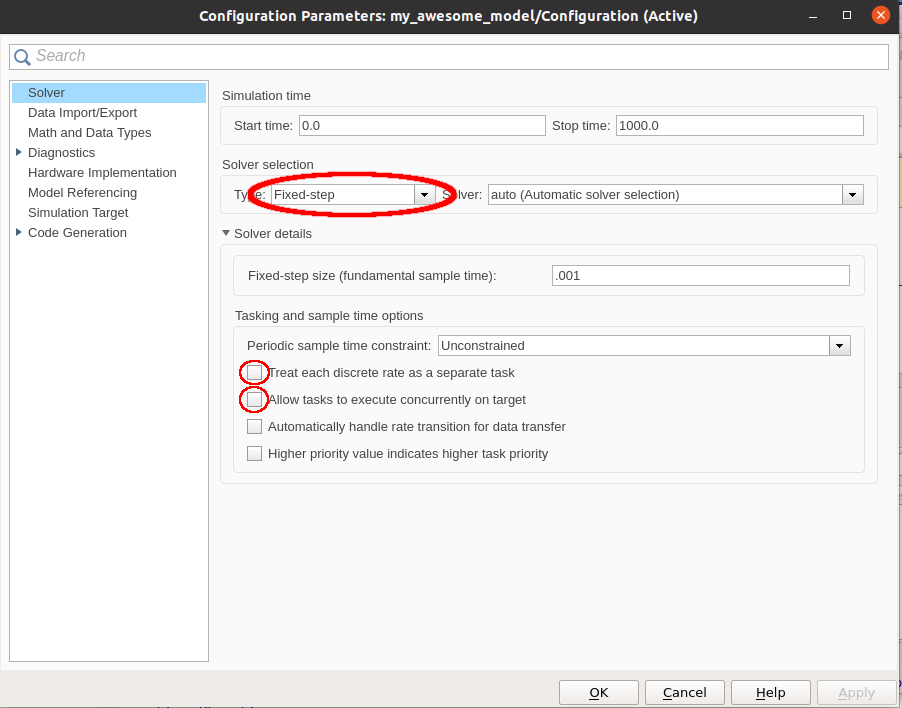
Solver settings
Code Generation Settings
On the Code Generation page, use grt.tlc as the System target file. Also check the Generate code only and
the Package code and artifacts boxes. This will generate a zip file with all of the code generated that you
can use with PySimlink. Since we’re not building anything, uncheck the Generate makefile box.
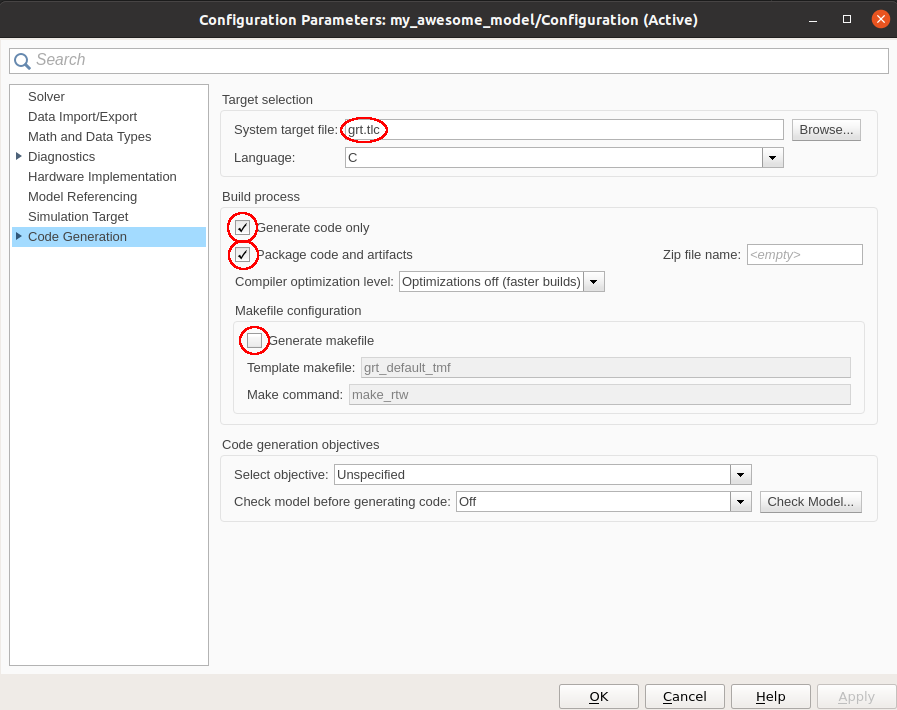
Code Generation Settings
Code Interface Settings
On the Code Generation -> Interface page, check the signals, parameters, states, and root-level I/O (even if you won’t be interacting with some of them, PySimlink requires these functions to be defined).
Next, scroll down and click the … at the bottom of this page to reveal more Advanced parameters.
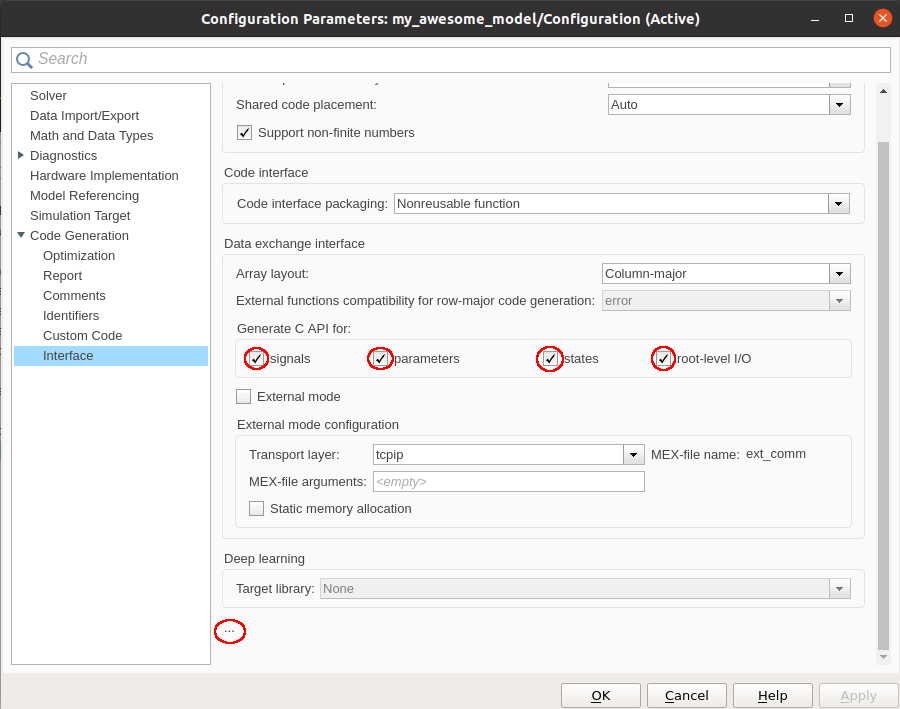
Basic Code Generation Interface Settings
Under the Advanced parameters section, uncheck the Classic call interface box and check the Single output/update function box.
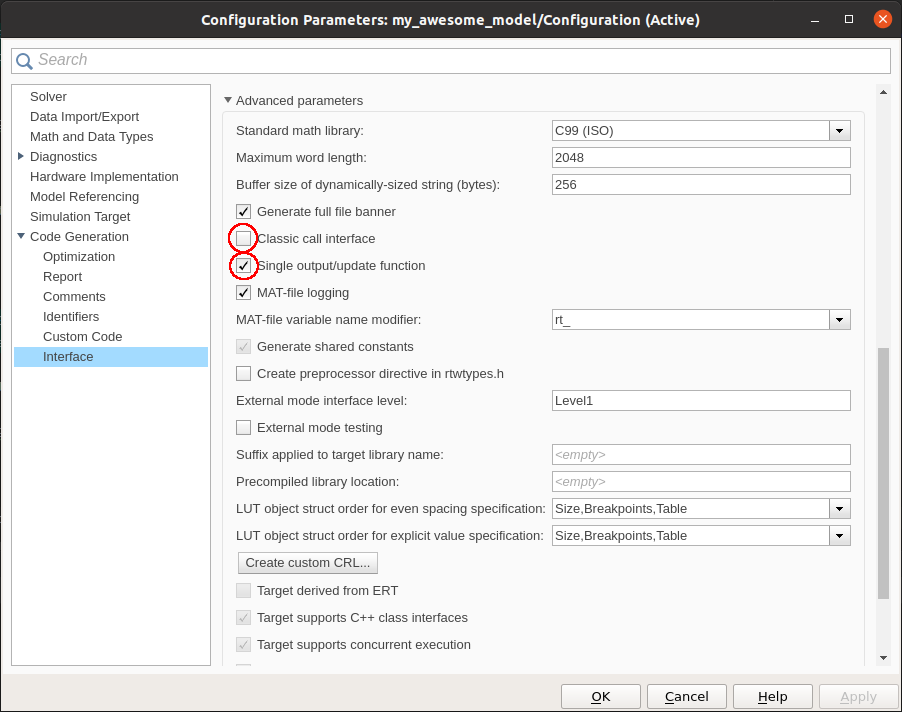
Advanced Code Generation Interface Settings
Done with model settings! If it’s a model reference, you’ll need to propagate these changes to each model.
2. Generate Code!
Now you can execute the code generation step. Open the Simulink Coder app and click the Generate Code button!

Simulink Coder in the Simulink Apps Menu Bar.

Generate Code button within Simulink Coder.
This will produce the my_awesome_model.zip file that you can use with PySimlink. Unless you modified the
Zip file name parameter in the Code generation settings, this will also be the name of your root model.
Find the Name of Your Root Model Without Simulink
Let’s say the file you’ve been given is called my_awesome_model.zip. It’s a good guess that the root model is
called “my_awesome_mode”, but here’s how you can double check without having to whip out Simulink.
Inside the archive, you’ll find 2 folders (if you don’t, then this was not generated by Simulink and PySimlink will
throw an error). One folder will contain extern, rtw, and simulink. The other will contain two
folders: slprj and [your_model_name]_grt_rtw.
In short, it looks like this:
my_awesome_model.zip/
├─ [a]/
│  ├─ extern/
│  ├─ rtw/
│  ├─ simulink/
├─ [b]/
│  ├─ slprj/
│  ├─ [your_model_name]_grt_rtw/
your_model_name is the name of the root model.
Compile and Run a Model
You’ve been given a zip file with a generated model (or you’ve generated it yourself. Way to go!). Now you want to
run it in Python. It’s as simple as importing PySimlink and calling print_all_params
from pysimlink import Model, print_all_params

model = Model("my_awesome_model", "./my_awesome_model.zip")
model.reset()
print_all_params(model)
Once you’ve figured out what signals you need to read, you can call model.step() to iterate over the model!
Change the Value of Signals
This feature is not directly supported by PySimlink. The reason why is kind of complex. In short, it would work for the fixed-step discrete solver. But for a solver with minor timesteps, changing the value of a signal could cause a singularity in an integrator, or might not even affect anything at all (if the signal is changed on the major time step from PySimlink, then updated by the originating block at the next minor timestep (which PySimlink does not control), then the change from PySimlink would have no affect).
How do we get around this? You’ll have to tweak the model and generate it again… While this is not ideal, this keeps us from violating solver during simulation.
Take this model, for example. And say you want to change the value of the highlighted signal during simulation.
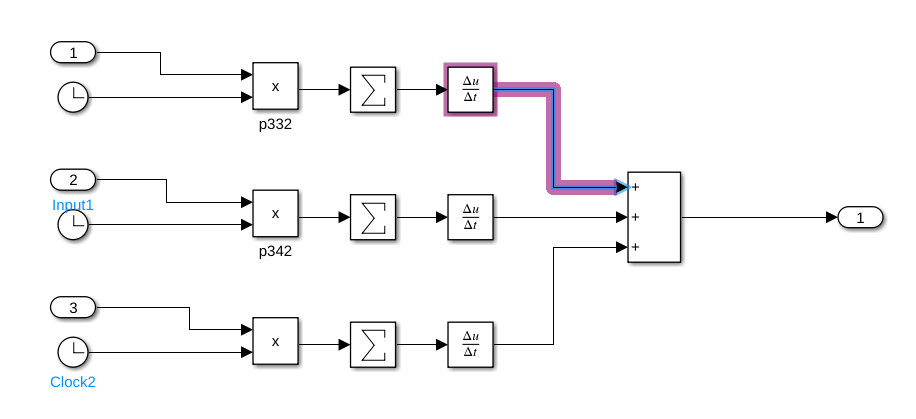
A garbage model with a signal whose value we want to change during simulation.
To be able to change the value, we need to terminate the signal and replace it with a constant. The resulting change looks like this.
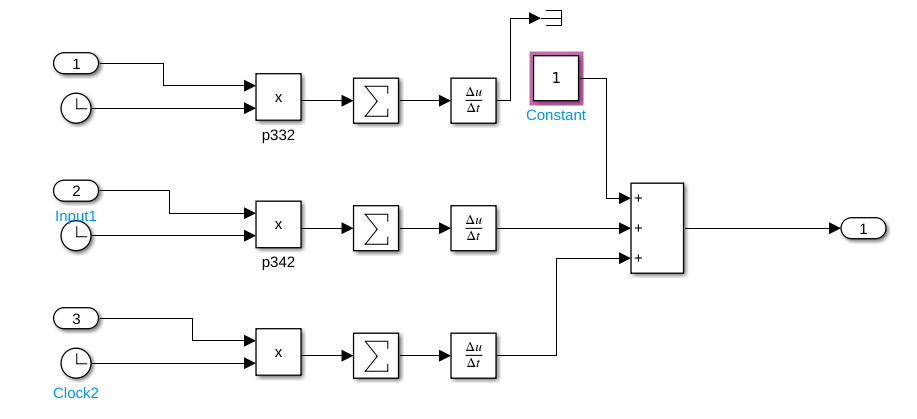
The same model adjusted so we can change the value of this signal during simulation.
Now, during simulation, we change the “Value” parameter of the block labeled “Constant”. While this may not simulate properly in Simulink, you can change this value at every timestep to get your desired behavior.
Tip
If you’re making changes to your model like this just for code generation or for PySimlink and don’t want to change its normal behavior, check out Variant Subsystems. You can have one subsystem for code generation and one for Simulink simulation.
Read The Value of Bus Signals
Note
New in pysimlink 1.2.0
Bus signals are a bit more complicated than other signals.
They are a collection of other signals, and can even be nested in other busses. PySimlink
allows you to read bus signal types and their contents. To see the available signals,
you can use the dir function.
model = Model("my_awesome_model", "./my_awesome_model.zip")
model.reset()
struct_signal = model.get_signal("my_awesome_model/sig1")
print(dir(struct_signal))
Note
There are a few python-internal properties prepended and appended by two underscores. These are not part of your bus and can be ignored.
You can access the signals in the bus as follows:
print(struct_signal.a)
print(struct_signal.b)